
Occasionally, there comes a time when someone needs to integrate a remote web server onto a website. This could be for testing purposes, or debugging, or they might just want to have a bit more control over part of a website.
The problem comes when this remote machine is behind a NAT or a firewall that doesn’t allow HTTP servers to be hosted. I had this issue the other day when a developer needed to run a service locally, but have it accessible on a public testing website.
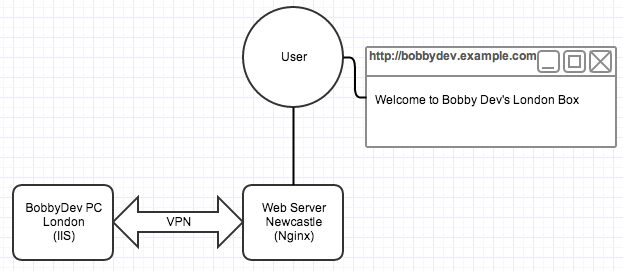
How we want to configure this set up.
This can be achieved by using a VPN tunnel. In this particular set up, we’re going to use the following:
Server side:
- Linux OS (In our case, CentOS)
- Nginx
- OpenVPN
Client side:
- Windows OS (Important as a special configuration needs to be used)
- A suitable web server listening on port 80
- OpenVPN Client
Firstly, on our Linux server, we’re going to install OpenVPN:
yum install openvpn easy-rsa
On Debian based servers, run the following:
apt-get install openvpn
Once this has been installed, we need to generate the keys.
cd /usr/share/easy-rsa/2.0/

source ./vars

./clean-all

./build-ca

./build-dh
(At this point, put the kettle on, this will take a while)
We’re going to create the key for the VPN server.
./build-key vpnserver
Fill out the values of the prompts that appear.
Now we’re going to create the key that we’ll send to the remote computer.
./build-key remoteserver
Follow the prompts through, pay special attention to the “common name” you set, as we’ll need this later – for arguments sake, lets say we set the common name to “bobbydev”
Securely copy the ca.crt, remoteserver.crt, and remoteserver.key files to the remote computer.
We now need to configure the server to accept VPN connections. Create the file /etc/openvpn/server.conf and add the following:
local 192.168.1.100

port 1194

proto tcp

dev tun

tun-mtu 1400

mssfix 1450

ca /usr/share/easy-rsa/2.0/keys/ca.crt

cert /usr/share/easy-rsa/2.0/keys/vpnserver.crt

key /usr/share/easy-rsa/2.0/keys/vpnserver.key

dh /usr/share/easy-rsa/2.0/keys/dh1024.pem

server 192.168.160.0 255.255.255.0

client-config-dir /etc/openvpn/staticclients

keepalive 10 120

comp-lzo

user nobody

group nobody

persist-key

persist-tun

status /tmp/openvpn.log

verb 3
Modify this to suit your needs, OpenVPN runs on port 1194 by default, so this can be either omitted, or changed. Also, make sure the local IP is identical to your network card’s IP address. This can be found by running the following command:
ifconfig
In the configuration, you’ll also notice the “client-config-dir” setting, this is where we will be putting specific configurations to allow our remote server to be given the same IP address every time.
We need to create the folder /etc/openvpn/staticclients and create a file with the same name as the common name we set in the key.
mkdir /etc/openvpn/staticclients

vim /etc/openvpn/staticclients/bobbydev
(obviously, use whatever text editor you’re comfortable with)
In this file we need to add the following:
ifconfig-push 192.168.160.2 192.168.160.1
This tells the client that it will be running on the IP 192.168.160.2 and the server will be at 192.168.160.1.
It is important to set this up that way if the remote server is going to be a Windows machine, as a limitation with the TAP-Windows driver limits IP endpoints to a very restricted subnet (255.255.255.252) meaning the IP addresses of the machines in the VPN must be valid, and next to each other. I could go into details about subnets, but that’s not really what this guide is about – see the bottom of this guide for a table of valid ending IP segments. The limitations are not present when running OpenVPN on Unix and Unix-like systems, so a subnet mask can be used in place of the server’s IP instead.
Finally, we’re going to create the configuration for the remote server to use to connect to our VPN:
client

dev tun

proto tcp

remote 111.222.111.222 1194

resolv-retry infinite

nobind

persist-key

persist-tun

ca ca.crt

cert remoteserver.crt

key remoteserver.key

ns-cert-type server

comp-lzo

verb 3
Send this to the remote server and test the connection to the VPN.
Finally, we need to configure Nginx to upstream requests to the remote server.
upstream bobbydevserver {

server 192.168.160.2:80;

}
server {
listen 80;
server_name bobbydev.example.com;
location / {
proxy_pass http://bobbydevserver;
proxy_next_upstream error timeout invalid_header http_500 http_502 http_503 http_504;
proxy_redirect off;
proxy_buffering on;
proxy_set_header Host $http_host;
proxy_set_header X-Real-IP $remote_addr;
proxy_set_header X-Forwarded-For $proxy_add_x_forwarded_for;
}
}
This configuration should forward all requests to http://bobbydev.example.com to the remote server through its VPN IP address. You may want to set up Nginx to display a custom 504 error message which would appear if the VPN wasn’t connected.
Cheers
Appendix
Here is a table showing a list of valid IP endings for use with Windows tunnels:
[  1,  2] [  5,  6] [  9, 10] [ 13, 14] [ 17, 18]
[ 21, 22] [ 25, 26] [ 29, 30] [ 33, 34] [ 37, 38]
[ 41, 42] [ 45, 46] [ 49, 50] [ 53, 54] [ 57, 58]
[ 61, 62] [ 65, 66] [ 69, 70] [ 73, 74] [ 77, 78]
[ 81, 82] [ 85, 86] [ 89, 90] [ 93, 94] [ 97, 98]
[101,102] [105,106] [109,110] [113,114] [117,118]
[121,122] [125,126] [129,130] [133,134] [137,138]
[141,142] [145,146] [149,150] [153,154] [157,158]
[161,162] [165,166] [169,170] [173,174] [177,178]
[181,182] [185,186] [189,190] [193,194] [197,198]
[201,202] [205,206] [209,210] [213,214] [217,218]
[221,222] [225,226] [229,230] [233,234] [237,238]
[241,242] [245,246] [249,250] [253,254]